Trigger remote data capture based on topic messages
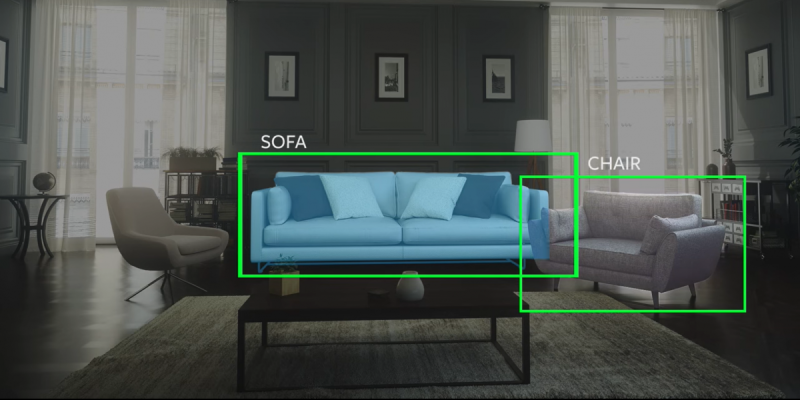
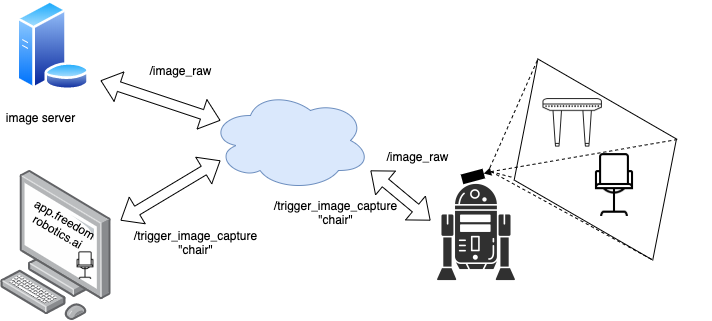
Many times, you want to remotely monitor, control and trigger robot's actions with your own servers or scripts. This is a simple example of doing so, where an image is saved from the camera of the robot to your local computer each time a specific message is triggered in the robot.

Trigger any action remotely using the Freedom API such as labeling images through the Pilot view for your data collection pipeline.
In this tutorial, you will learn how to:
Use your robot as a data collection platform to classify and save images of tables and chairs to perform machine learning on later so that the robot can learn to classify them itself later. We will:
- Set up message triggers on the Freedom API
- Set up your API credentials
- Write a simple server (off-robot) script to save images on a message
- Save images to your server through the API
- Apply this to other actions you need to trigger remotely
Here is the full GIST for this tutorial.

Label images from anywhere while the robot is in operation and trigger a save to a remote server.
Define your trigger messages
We’ll be publishing a std_msgs/String message on a new topic we’ll call /trigger_image_capture which will contain what we see in the image, either a chair or a table. You can of course define a custom message to fit your needs.
Add trigger commands to Pilot
Start by adding these command messages to the Pilot view so that they appear on top of the images while you’re operating the robot.
To do that, go to SETTINGS -> PILOT and click ADD NEW COMMAND and then add any commands you want your operators to easily trigger. You'll specify a topic you would like information injected on and the payload on that topic.
For this example, specify the /trigger_image_capture topic with a type of std_msgs/String and payload of:
{
    "data": "chair"
}
Once you have triggered one of these commands, go back to your device’s STREAM page and look for that topic name to make sure it appeared. You should see the topic and the message you sent in.
Make sure your trigger topic receives appropriate bandwidth
In settings > bandwidth, make sure
/trigger_image_captureis set toAllor at least high enough so none of your commands go missing.
Set up your API Credentials
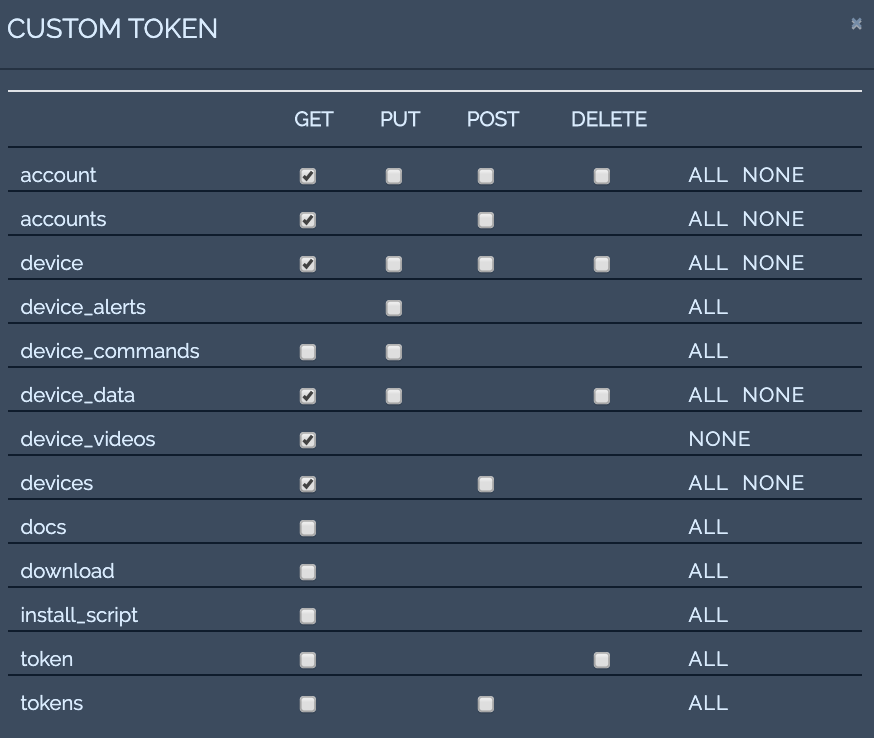
The first step is to create an API token which will give your server or development machine rights to access your devices, send commands to the /trigger_image_capture topic, and retrieve video frames.
Go to the upper right MENU (keyboard shortcut: G then S) -> MANAGE TOKENS -> CUSTOM (tab) then CREATE.
- Give the token read rights (GET) for only the minimal API endpoints you need to access and stream out data -
account,accounts,device,device_data,device-videos,devices. - Select either a single device or
*for all devices in your account to identify which elements it has rights to. - For Type, enter
API. - For Description, enter “API token to allow streaming of images on a specific message trigger.”

You can create custom API tokens with very specific security privileges.
Always give minimal necessary credentials
When creating a custom token, you can define which API access it should have. You should always give a token the minimal access necessary and define a description which clarifies what the token is used for.
- You will see the token and secret when you click create. Copy those and save them in a JSON format as you see below. You will not be able to retrieve your secret again so keep it safe.
- Save this file as
~/.freedom_credentials.
{
    "token": "T0000000000000000000",
    "secret": "S00000000000000000000",
    "account": "A000000000000000000",
    "device": "D000000000000000000"
}
What should I put into "account" and "device" keys?
The account can be taken from MENU -> TEAM SETTINGS -> Account -> ID
For device, you can go to the device page, SETTINGS -> DEVICE -> ID
If you want to run this script with different devices then you can easily modify it to get the device id from arguments or somewhere else.
Jumping into the code
Now that we can trigger image capture, let’s take a look at how we can respond to those triggers and save the image data to file. You could run this on a separate server and the process would be exactly the same, but for now let’s run it on your computer.
First, import a few standard modules. You may need to install requests (pip install requests), the Python HTTP requests library.
import os
import json
import time
import requests
Next, load your API credentials you created earlier, specify your device, and create the headers for the request:
CREDENTIALS_LOCATION = "~/.freedom_credentials"
CREDENTIALS_LOCATION = os.path.abspath(os.path.expanduser(CREDENTIALS_LOCATION))

try:
		with open(CREDENTIALS_LOCATION) as credentials_file:
    		credentials = json.load(credentials_file)
except json.JSONDecodeError:
     raise ValueError("Credentials are not a valid JSON. Please check file {}.".format(CREDENTIALS_LOCATION))

headers = {
    'content-type': 'application/json',
    'mc_token': credentials['token'],
    'mc_secret': credentials['secret']
}
We'll create two helper functions, one to check for new trigger messages and one to get the last images, for when a trigger message has been received:
def get_messages(headers, account, device, start_time, end_time, topic, req_session):
		url = "https://api.freedomrobotics.ai/accounts/{account}/devices/{device}/data".format(account=account, device=device)
    params = {
      	'utc_start': start_time,
        'utc_end': end_time,
        'topics': json.dumps([topic]),
    }
    r = req_session.get(url, params=params, headers=headers, stream=True)
    data = r.json()
    if not isinstance(data, list):
        raise Exception("Should have returned a list of data. Not: " + str(data))
    r.raise_for_status()

    return data


def get_image_topics(headers, account, device, req_session):
    url = "https://api.freedomrobotics.ai/accounts/{account}/devices/{device}/videos".format(account=account, device=device)
    r = req_session.get(url, headers=headers, stream=True)
    data = r.json()
    if not isinstance(data, list):
        raise Exception("Should have returned a list of data. Not: " + str(data))
    r.raise_for_status()

    return data


def get_frame(headers, account, device, topic, req_session):
    url = "https://api.freedomrobotics.ai/accounts/{account}/devices/{device}/videos/{topic}".format(account=account, device=device, topic=topic)
    r = req_session.get(url, headers=headers, stream=True)
    data = r.content
    r.raise_for_status()

    return data
Now let's create the main loop which will watch for incoming trigger messages and pull the video stream when a trigger message is received. We'll then save these video frames to the directory ./frames. Every 30 seconds, we'll also write all the trigger messages we saw to file in ./data.
TRIGGER_TOPIC = "/trigger_image_capture"


if __name__ == "__main__":
    requests_session = requests.session()

    # Create the directories for storing data if they don't yet exist
    if not os.path.exists("frames/"):
        os.mkdir("frames/")
    if not os.path.exists("data/"):
        os.mkdir("data/")

    start_time = time.time()
    last_time_saved_data = time.time()
    data_cache = []
    while True:
        end_time = time.time()
        data = get_messages(headers, credentials['account'], credentials['device'], start_time, end_time, TRIGGER_TOPIC, requests_session)
        start_time = end_time + 0.000001  # start right after the last end time so we get unique messages only and don't skip any

        if len(data) == 0:  # no trigger messages detected
            time.sleep(5)
            continue

        # we received a trigger message
        data_cache.extend(data)
        print("Received trigger message:")
        for d in data:
            print("\tcontents: {}, time received: {}".format(d["data"], str(d["utc_time"])))

        for message in data:
            trigger_message = message['data']['data']
            image_topics = get_image_topics(headers, credentials['account'], credentials['device'], requests_session)

            if len(image_topics) == 0:
                print("\tTriggered saving images but there are none published")
                continue

            for topic in image_topics:
                print("Getting video frame from topic {}".format(topic))
                frame = get_frame(headers, credentials['account'], credentials['device'], topic, requests_session)
                topic = topic.replace("%2F", "_")
                file_name = "frames/" + str(time.time()) + "-" + trigger_message + "-" + topic + ".jpeg"
                with open(file_name, "wb") as f:
                    f.write(frame)

        # Save the data into json files every 30 seconds, if there is any
        if time.time() - last_time_saved_data > 30 and len(data_cache) > 0:
            file_name = "data/" + str(int(last_time_saved_data)) + "-" + str(int(time.time())) + ".json"
            with open(file_name, "w") as f:
                f.write(json.dumps(data_cache, indent=4))
            data_cache=[]
            last_time_saved_data=time.time()
The consolidated code sample can be found in the Gist at the bottom of this page.
Trigger your first image
Now, go to your SETTINGS -> SEND COMMAND and click to send your first message in. You will see a video image appear in your ./frames/ directory with the time stamp and the message you did.
Now, try using the pilot mode and trigger messages as an operator.
What's next
There's a lot of things you could do with this:
- Let the robot trigger capturing images or video autonomously so that when you are testing your chair vs table classification algorithm, you can take a look at what the robot classified correctly and falsely. In that case, simply publish to the
/trigger_image_capturefrom within your classification node. - Use your own frontend that allows you to draw bounding boxes around objects so that you can have your algorithm learn where the objects are
- Use the Freedom web app to record clicks on the screen so that you can show the robot where the elevator button is it must press
- Rather than saving images, send the robot on a mission to visit waypoints or go look for a specific object.
Full code sample
You can find the full code example in a GIST. Just update your credentials and the device you want to monitor.
Updated almost 6 years ago
