Advanced Gamepad Control
Unleash your gamepad
Time to complete: 10 minutes
In this tutorial, we'll go over how to set up and move any robot using a gamepad or other controller. A mobile base can be commanded with simple velocity commands whereas for complex robots and robot arms we will need fine-grained control. Velocity commands to a mobile base will be translated from gamepad joystick axes into a Twist or TwistStamped message, which is then sent to the topic of your choice, whereas the more flexible, custom control is enabled through Joy messages.
Connect your gamepad
The gamepad will be automatically detected when the user has plugged it into their computer.
Gamepad Support
Currently, the Xbox and ps4 controllers are only supported. The Nintendo Switch Pro Controller does have some inconsistencies.
Using the gamepad to send Twist messages
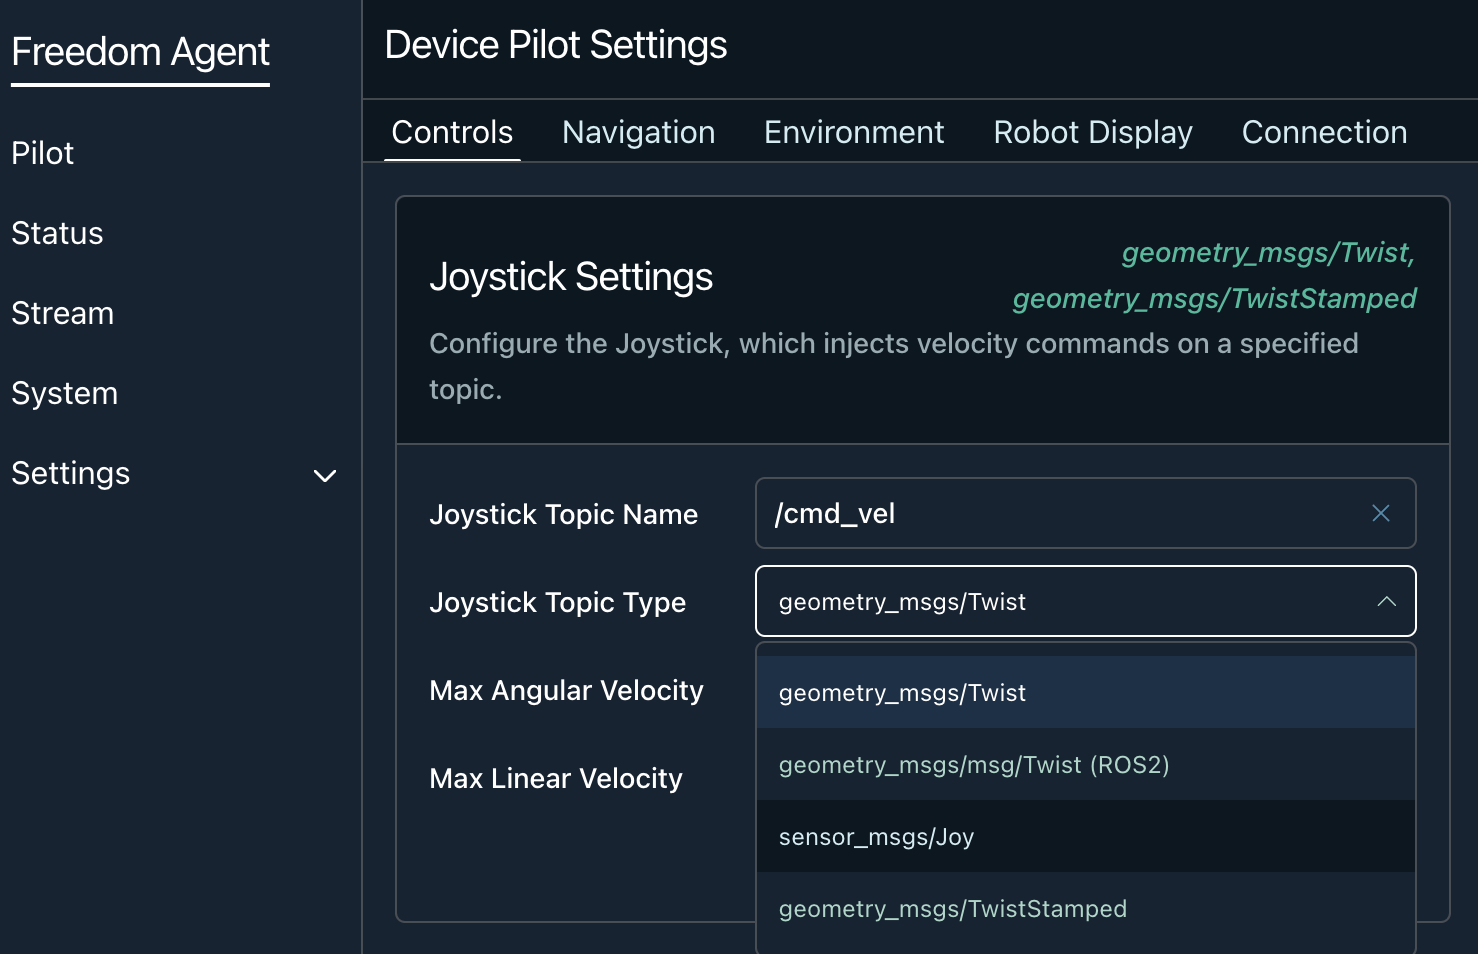
This works out of the box with simple gamepads like the Xbox controller. In SETTINGS > PILOT > CONTROLS, set the topic type to either Twist or TwistStamped and choose the joystick topic name you want these velocity messages to get published to, typically /cmd_vel. In this simple setup, the left vertical axis is translated to a linear forward velocity (linear.x) while the right horizontal axis is converted to a left-right rotation (angular.z). This setup works best if you have a mobile base with a topic set up accepting Twist messages.
Using the gamepad to send Joy messages
Joy messages essentially contain a list of all buttons and axes that are pressed or moved at any given time and so contain more information than a twist message. If you need more advanced joystick control or want to save state, or if your robot already has a topic set up accepting Joy messages, this is for you.
The axes in a Joy message are typically values between -1 and 1 which represent triggers and joysticks on your controller.

A sample Joy message.
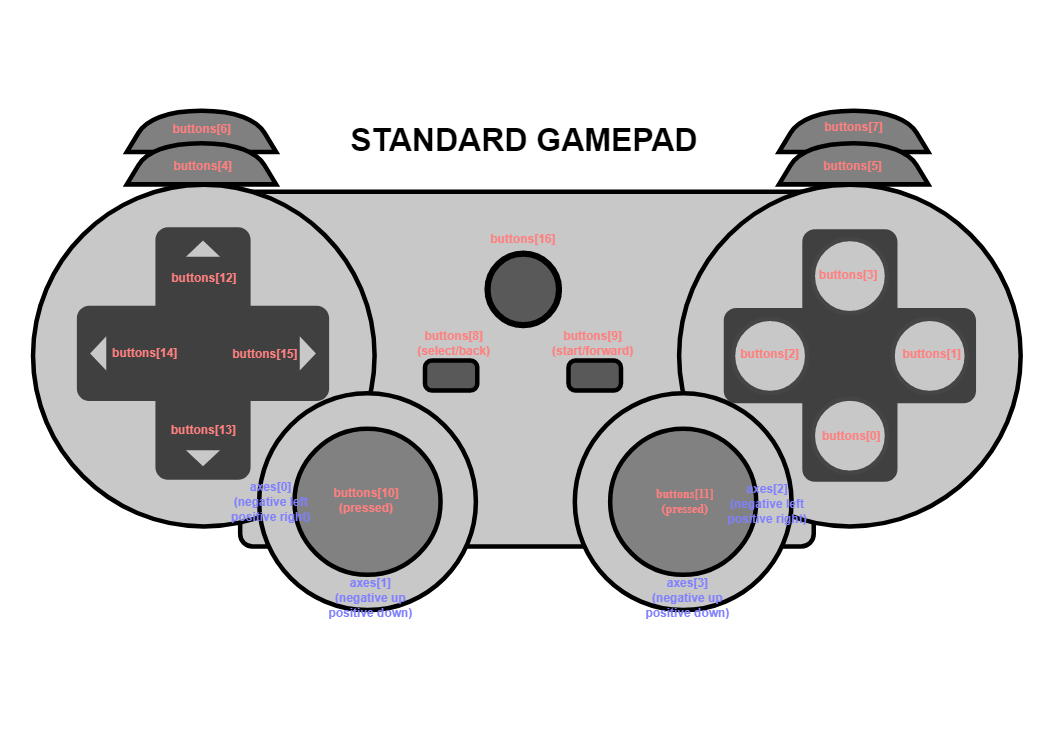
The default mapping for standard controllers is as below. We recommend using the joystick remapper node to change these values to your desired configuration on the robot side.

Button and axis mapping on the standard gamepad.
In the Pilot Settings page, change the topic type to sensor_msgs/Joy and set the joystick topic name to the topic you want to receive messages on, typically /joy or /joy_orig.

In SETTINGS > PILOT > CONTROLS, set the joystick topic type to the sensor_msgs/Joy message and choose what topic you want those messages to be received on.
Supported gamepads
Most common gamepads are supported but not all functionality might be available. We've tested on the PS4 controller and the Xbox controllers. Make sure your gamepad works as expected by checking the received messages on the robot.
Translating Joy messages to actions
If your robot doesn't have a topic already accepting Joy messages, you will need to write something up yourself. Luckily many great examples already exist. For a ROS + c++ implementation, I recommend Fetch Robotics Joy converter node as a starting point. If you're looking for a simple skeleton for Python + ROS, copy paste and modify the code below, which publishes the joy messages to an end-effector Twist command topic:
#!/usr/bin/env python

import rospy

from sensor_msgs.msg import Joy, JointState, Twist
from trajectory_msgs.msg import JointTrajectory, JointTrajectoryPoint


class JoyToCommands(object):
		"""Control a robot arm using Joy messages"""

    def __init__(self):
        self.twist_pub = rospy.Publisher('/twist', Twist, queue_size=1)
        rospy.Subscriber("/joy", Joy, callback=self.joy_cb, queue_size=1)
        self.linear_vel_multiplier = 0.3
        self.angular_vel_multiplier = 0.2

    def joy_cb(self, joy_msg):
        rospy.logdebug_throttle(0.5, "received joy message: {}".format(joy_msg))

        twist_cmd = Twist()
        twist_cmd.linear.x = self.linear_vel_multiplier * joy_msg.axes[3]
        twist_cmd.linear.y = self.linear_vel_multiplier * joy_msg.axes[2]
        twist_cmd.linear.z = self.linear_vel_multiplier * joy_msg.axes[1]
        twist_cmd.angular.z = self.angular_vel_multiplier * joy_msg.axes[0]

        self.twist_pub.publish(twist_cmd)


if __name__ == '__main__':
    rospy.init_node("joy2commands", log_level=rospy.INFO)
    JoyToCommands()
    rospy.spin()
Updated over 3 years ago
Now that you have advanced gamepad control working, let's see what we can do with your mouse!
