Deploying Freedom with Docker

Why Deploy with Docker
Unlike cloud-based projects with Serverless, Kubernetes, and other scalable systems, there is no mature robotics deployment infrastructure. Therefore, many early- and mid-stage robotics development projects rely on complex, unsable and poorly documented deployments:
- Custom shell scripts
- Imaging the hard drive of a working version and copying it to a new one
- Building a Debian package of all code and installing it
- Checking out a GIT repository and building it on the robot
They have major issues with reproducibility, stability, understandability and security as they are usually complex enough that no one actually knows the steps to rebuild them.
Deploying with Docker gives many advantages for robotics deploys as a company starts to scale because you have a reproducible, clearly documented and atomic way to install, update and scale to the next system without any changes.
Docker Implementation
With Docker, you just have 1 dependency - installling Docker (sudo apt-get install docker-ce for ubuntu). Once that is installed, your only deployment step is to download an image with docker pull robot_image then run docker run robot_image with the right parameters.
Positives of Docker Deploys:
- Clear creation and documentation process
- Broken deploys do not change the underlying OS
- Easy to roll-back atomically
- Clear segmentation of different parts of your system
- Strong deployment process
- Easier to build simulations separate from hardware
Challenges with Docker Deploys:
- New framework for a robotics team to support
- More time to build your image the first time
- Getting security credentials into your container
- If using ROS, sharing message definitions
- Mounting USB and other devices is complex
Overall, Docker is well worth the investment.
Create your Freedom-Enabled Docker Image
First of all you will need to create your own Dockerfile. For further details on how to create yours, check the Dockerfile reference from Docker docs.
To add Freedom to a docker image, you just have to install the agent in your docker build, inject in credentials at runtime and trigger a keep-alive in the ENTRYPOINT.
Example Code
For this tutorial, we will use code from a gist which is a simple, generic setup of a Freedom Robotics enabled docker image with the ability to launch it with valid security credentials.
Choose a good base image:
The first line of your docker file is FROM {image}. You should choose an image which is cleanly built, maintained (whether you do it or someone else) and contains as many appropriate dependencies of your system without being too bloated.
FROM ubuntu:18.04- The simplest docker image for linux. If you are not using ROS, then this is a great place to begin. You will need to add all your dependencies including every debian package you need to install, so this can make your dockerfile verbose.FROM ros:melodic- The easiest way to use ROS. If you use ROS 1, then this docker image allows you to not set up the install of ROS and other minimal dependencies. Note that you can change the ROS 1 release name to newer versions also.FROM frdmrobotics/playground- To add in dependencies necessary for standard ROS 1, ROS 2, robotics development, devops and Freedom, this somewhat larger image gives you a very simple starting point so that you can have a minimal set of additions in your system.
Add the Freedom Agent in your Container
You should add these lines to your Dockerfile to install the current version of the Freedom Agent where it does not try to turn on the agent itself. Gist example
RUN apt-get update && \
    apt-get install -y curl python-pip && \
    rm -rf /var/lib/apt/lists/*

RUN curl -sSf "https://api.freedomrobotics.ai/accounts/INSTALL_ONLY/devices/GENERIC_DEVICE/installscript?mc_token=INSTALL_ONLY_DEVICE_TOKEN&install_elements=warn_no_fail,no_credentials,service_none" | python
Python 3 Support
If you are using Python 3, run the curl command with | python3
NOTES:
- You can use
python3also, if you are not running ROS 1. - You can add more advanced elements, such as enabling
webrtcby adding them in a comma separated list in theinstall_elements. If you add them, please also remember to add them to thecredentials.envfile below
Copy in necessary files
You will need to add a minimum of 2 files to your docker:
freedom_register.py- Creates a credentials file based on the environment variables passed into the docker container. It then registers the freedom agent as a service and starts it.freedom_keep_alive.py- Because Docker does not run a full system.d or init.d daemon, if the agent exits, it will not automatically restart, so this script acts as a simple keep-alive.
You can get them from the Gist.
RUN mkdir /freedom
COPY ./freedom_register.py /freedom/
COPY ./freedom_keep_alive.py /freedom/
NOTE: If you don't already have an ENTRYPOINT script, you can add the generic Freedom entrypoint.sh file as a starting point and then edit it.
COPY ./entrypoint.sh /freedom/
Executable Files
Make sure that each of these files are executable on your local system so that the ENTRYPOINT can trigger them. Otherwise you will get a "Permission Denied" error.
Edit your ENTRYPOINT
You will want to add something like the below script to your ENTRYPOINT script you trigger to trigger the import of environment variables as a credentials file, registration of freedom as a system service then the starting of the service.
You can add this to any other commands for startup. Note that the register script must finish before launching the keep-alive one, which should be backgrounded to allow other things in the system to happen.
#!/bin/bash

python /freedom/freedom_register.py
python /freedom/freedom_keep_alive.py &
sleep infinity
And add it to the Dockerfile
ENTRYPOINT /freedom/entrypoint.sh
NOTE: Remember to copy in your entrypoint.sh file or other command you want to run as part of the image startup.
Compile the image
Now, you are ready to compile to docker image.
docker build -t robot_image .
And you are ready to run!
Launching the Docker Image
To launch the docker image, you will want to add a few parameters in addition to just running it.
Import Credentials from Environment Variables
You will need to provide Freedom Robotics API security credentials for the image in the form of 4 environment variables which the freedom_register.py script can read. You can do this by writing them into an environment file (Multi-line VARIABLE=value file).
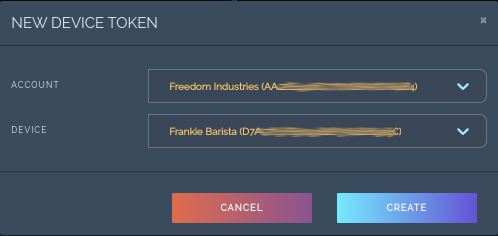
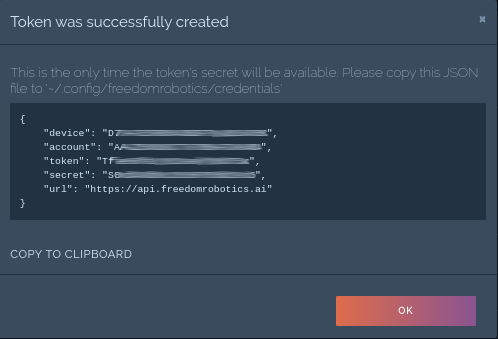
First you will need to go to the APP and generate the new credentials for the device. For this go to TEAM SETTINGS -> TOKENS, make sure you are on the tab DEVICE and press CREATE button.

Select the device you want to give access to, press CREATE

Save the credentials in a file as credentials.env with the following format:
FR_ACCOUNT=A0000000000000000
FR_DEVICE=D0000000000000000
FR_TOKEN=T00000000000000000
FR_SECRET=S0000000000000000
FR_INSTALL_ELEMENTS=warn_no_fail,no_credentials,service_none
Please update FR_INSTALL_ELEMENTS with webrtc and other install parameters if you customize your install.
You can also create it programmatically using the API as you scale up the number of devices.
Launch for the first time
Now, you just have to launch your docker image as a container and you are running. Below is a minimal way to do so, given that you have created an environment variable file in the same directory called credentials.env.
docker run --env-file credentials.env --name my_device1 robot_image
If everything goes well, you should see the container launch with no errors and then in the web app you should see the device say that it is connected.
Getting inside the container
If you need a bash session inside your device container you can easily run the below command.
docker exec -it my_device1 bash
Naming your containers
When having multiple containers that you want to reuse, its a good practice to name while executing
docker runcommand with just adding--nameargument. This way you have more control if you want to check the container status, execute commands, etc
Add your own Project Code
In addition to running Freedom, you will want to add your own robot code. We suggest adding lines for that after the RUN curl ... | python and COPY ... lines so that when you recompile your image, it will not have to recompile the agent as its code has not changed.
Deploying at Scale
If you want to deploy many robots automatically, then you will want to create a simple orchestration script which uses the Freedom API to create a new device for each one, create a token for that device and copy in your custom attributes to set it up.
You can also check out services such as Balena.io (Formerly Resin.io) and others which do orchestration of the install and update of systems.
Advanced Features with Docker Images
Add audio output
With a docker image on a linux ubuntu base OS, you can easily add support for sound out by mounting /dev/snd with --device /dev/snd.
docker run -t -i --device=/dev/snd ubuntu bash
You will also want to add a few debian packages, such as alsa-utils and pulse-audio.
Add USB Device support
You can use the --device flag to map in specific USB devices without needing full privileges if you know what they will be.
docker run -t -i --device=/dev/ttyUSB0 ubuntu bash
To map in all usb devices, you have to enable --privileged mode and then mount the full USB device tree.
docker run -t -i --privileged -v /dev/bus/usb:/dev/bus/usb ubuntu bash
Updated over 4 years ago
